
This is the same docketed encounter discussed previously. Now that you’ve seen one potential outcome, what I present here is demonstration that any one enounter can have a wide variety of results, but also a method that adds complexity to the potential results that is not entirely in the hands of the person/people running the game.
To recap, the original scenario has the following elements.
- A raiding force of orcs was encountered in the forest, moving away from Fort Fenrir with their ill-gotten gains.
- A force of troops were sent to pursue the orcs and catch up to them with an encounter distance of 13″.
But, we really don’t know how the two forces will react upon meeting. We know the orcs want to escape with their gains. But they also might want more gains. Or, want the glory of a successful battle versus the humans. Or, something in between. Might they try an ambush? We know an ambush is impossible because the referee has already rolled for surprise, but they don’t know that. They might still try. Maybe, if available, they might want to try to capture some slaves? Lure the Fenrir troops toward their lair and additional orc troops? Who knows? How to set the orcs goals for the encounter. Well, let’s decide randomly. We’ll make a table.
- Go for a stand-up battle
- Set up an ambush
- Lure the Fenrir forces back toward the orc lair
- Try to escape
- Try to escape
- Attempt to capture prisoners, then escape
Now the Fenrir forces. What do they want. Most likely to destroy the orc forces outright. Capture the leader?Reca Ensure the loot is recaptured?
- Annihilate the orcs in battle
- Annihilate the orcs in battle
- Annihilate the orcs in battle
- Capture the leader
- Recapture the loot
- Recapture the loot
Obviously I’ve made judgments of that is more likely. And, someone else might have other ideas. But, once the dice are rolled something will be generated that is outside of my control. So, here’s the roll. Green is, of course, the orcs.

So there you go. The obvious goal for the Fenrir troops, and perhaps the worst decision for the orcs — because we already know surprise is off the table.
So, now for the terrain. Like last time using the Chainmail method. Orcs place first.

Orc Draws
- Hills
- Gully
- Blank
- River
Fenrir Draws
- Woods
- Hills
- Hills
- Woods
We got a lot more terrain than last time. The result being a much more constrained map. Several hills, a couple forests, a river, and a gully. For this one I’m ruling the river isn’t as hard to cross as the river from the earlier scenario. This one, just costs twice the movement points to cross. The gully is a dried up streambed that in rainier seasons feeds into the river. Moving across the gully will match that of the previous scenario: stop at edge, move into it, then move out. But movement along the gully is as normal.

The orcs set up first in ambush positions. The trick is the middle 13″ of the map (one square = 1″) are off bounds. The Axe orcs start hiding in the gully. The crossbow orcs start at the crest of the left hill. The orc subchief, his guards, and the sword & spear orc start on the backside of the main hill. The fork orcs start in the flats between the big hill and the small forest.
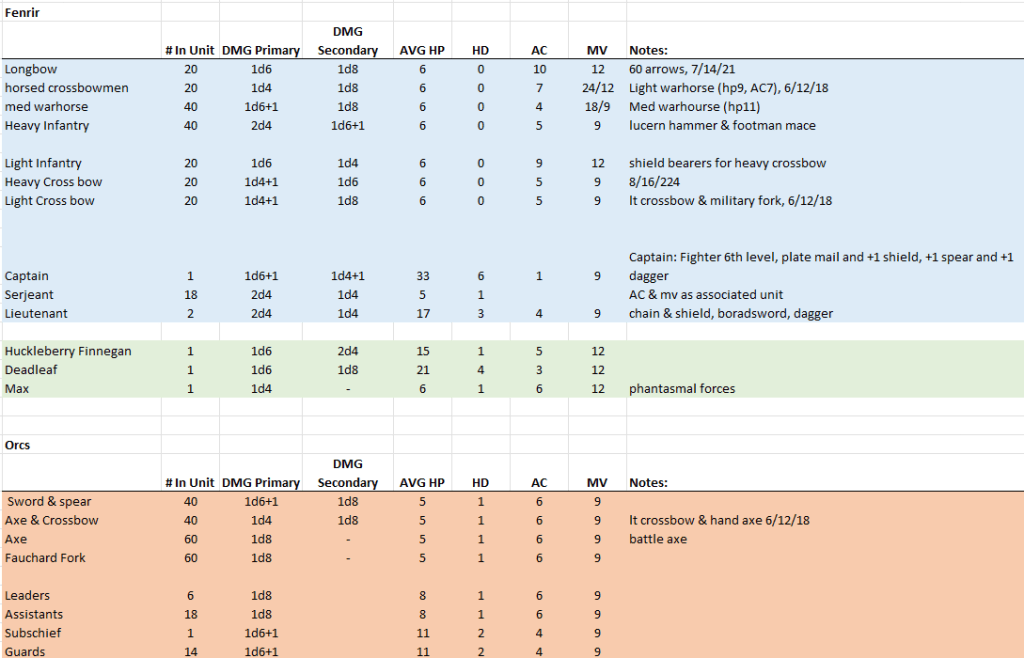
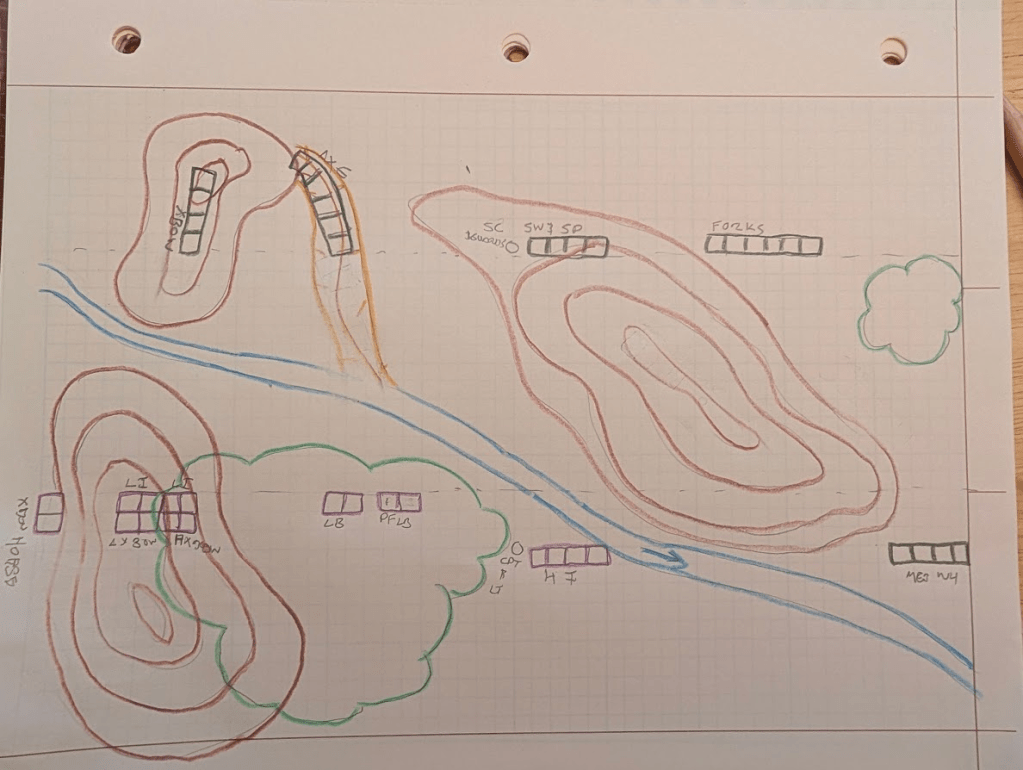
We can see the starting positions here. As previously noted there is no surprise going on, and the Fenrir troops have a ranger along. The presumption being that while the orcs have tried to set up an ambush, the Fenrir forces are onto them. As such the light horse have been placed on the left to move swiftly across the river to occupy the orc crossbows. Similarly, the human light infantry and crossbows have been placed on the south hill to engage the crossbows and, when opportunity comes to fire down into the gully. The longbow forces have been placed such that they can move out of the woods to fire on the gully entrance. The hope being to bottle those orcs in the gully. The Fenrir Captain and the heavy infantry are placed in reserve to see what where the other orc forces go. The medium horse has been placed on the right flank to move rapidly across the river into the more open (a bit) terrain and cut up any orcs that might be back there.
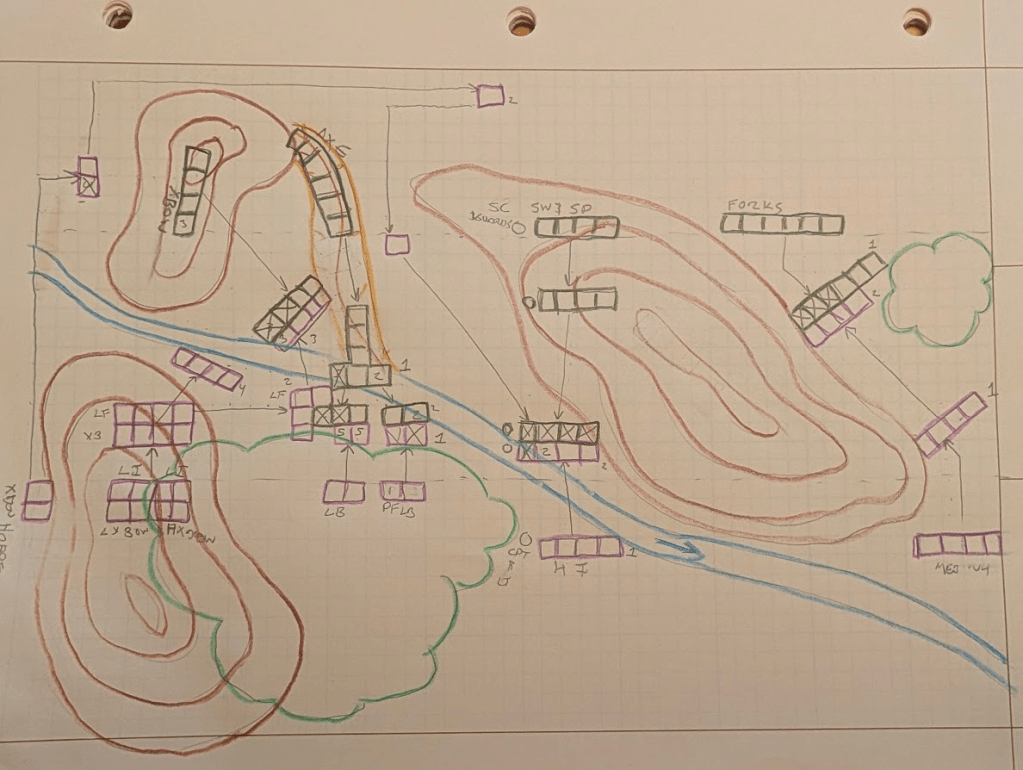
Round 1:
Tied Initiative (2,2).
The light horse gallup up to take a position behind the hill where the orc crossbows are stationed. In turn, the orc crossbows about face to face horsemen. Both sets of crossbows exchange fire at close range. The light horsemen miss. The orcs hit once for 3 hp. Neither side has lost a stand yet.
The axe orcs start to move out of the gully, but the force only gets halfway out and is standing in the river. The two units of longbows move to the edge of the woods. The longbows open fire on the axe orcs. They score three hits, but on different stands. One stand is eliminated.
Both sets of Fenrir crossbows fire across the stream on the orc crossbows. The range is medium and no hits are scored.
The sword and spear orcs climb up the hill and crest the ridge. The Fenrir heavy infantry stands firm.
On the right, the fork orcs wheel to fill the gap between the hill and the small forest. The medium horse move around the base of the hill to face the fork orcs.
That’s the first round. Fenrir is playing it cautious. The orcs only somewhat more aggressive. But, the longbows are in danger of being charged by the axe orcs.
Round 2:
The orcs win initiative (5,3).
The orc crossbows fire again on the light horse. One stand is eliminated. This calls for a morale test. The Fenrir light horse pass the test and stand.
The axe orcs charge the longbows. The group that charged the phantasmal force failed their saving throw and still believe the phantasmal force is real. The real longbow get hit twice for 5 hp each on two stands. They are hurting but none eliminated. The phantasmal force is hit once and one stand is eliminated.
The sword and spear orc move down the ridge to place themselves to intercept the Fenrir heavy infantry and prevent them from helping the longbows.
The fork orcs brace their forks against the charge.
The remaining light horse ride around the hill and through the enemies backfield. They chose discretion over getting chewed up more by the orc crossbows.
The light infantry screening the Fenrir crossbows moves downhill to take the axe orcs on the flank. They get a single hit for 6 hp which eliminates a stand of the axe orcs. In turn, the longbowmen draw swords and attack the axe orcs. They get one hit for 8 hp, another stand is eliminated. The phantasmal force longbowman attack, but this drives another saving throw for the orcs. And, the orcs make their save, the phantasmal forces evaporate into the twilight. This leaves Huckleberry, Deadleaf, and Max standing to face a force of sixteen axe orcs. Fortunately for the three PCs, the axe orcs have now lost three of their six stands, so a morale roll is called for. The axe orcs fail the morale roll with a roll of 86, a surrender! They throw down their weapons just as the phantasmal force dissapates. They are very confused.
The heavy crossbows hit the crossbow orcs for 3 hp. The light crossbows miss.
The heavy infantry charges the sword and spear orcs. The question then is which side gets to attack first, meaning which has the longer weapon? The heavy infantry has lucern hammers which are listed as 5’+. The orcs have spears which are listed as 5′-13’+. Not very helpful. To adjudicate which side has the greater reach I ruled that the Fenrir troops add d6-1 to the length and the orcs add d10-1 for the length. The Fenrir lucerne hammers come to 7′ and the orcs spear to 9′. The orcs attack first. They score two hits, but only 1 hp and 2hp. The Fenrir heavy infantry lose no stands. They score two hits, one of 5hp and one of 6 hp — the sword and spear orcs lose two stands. This triggers a morale roll, which the presence of their Subchief allows them to make. They remain in combat.
Like the previous battle the medium horse again charge the fork orcs. Once again the lances are longer and the cavalry attack first. Three hits are scored for 9 hp, 13 hp, and 9 hp. Three stands of forks are eliminated. This triggers a morale roll. And, another high roll of 94 leading to surrender.
Round 3:
Orcs win initiative (2,1).
The orc crossbows move down the hill to approach the Fenrir light foot with the hope of rallying the surrendered axe orcs. Another morale roll is made for the axe orcs, they remain surrendered.
Apparently unobservant of whats going on with the axe orcs, the orc Subchief decides to fight on. A fighting withdrawal seeming unlikely. One hit is scored which eliminates one stand of heavy infantry. The heavy infantry makes a morale roll, having lost 25% of their unit. They remain in the fight.
The fork orcs, having surrendered are being rounded up by the medium horse.
The light horse move to flank the orc crossbows, they fire but miss. The heavy crossbows are reloading. The light crossbows fire on the orc crossbows but miss.
The light foot cross the river to engage the orc crossbows. All their attacks miss.
The longbowman, are busy rounding up surrender axe orcs.
The heavy infantry continue attacking the sword and spear orcs. They score one hit for 8 hp, which kills a stand. This triggers a morale roll. The orc subchief decides to retreat.
Round 4:
Fenrir wins intitiative (4,1).
The light horsemen charge the sword and spear orcs from behind with their swords. The orcs have spears which would otherwise give them first attack, but they are facing the wrong way. The light horseman hit for 8 hp which eliminates the final stand of sword and spear orcs.
The light foot continue engaging the crossbow orcs but score zero hits (in fact roll three ones and two). The Fenrir crossbows move down the hill to engage the crossbow orcs on their flank. The light footman are engaged with the orcs, so I randomly roll to see which forces become the target. It’s fifty/fifty. The orcs get two hits, and the light footman get hit once by the light crossbows. Two stands of the orcs are eliminated. The light footman take 3 hp of damage but do not lose a stand. The orcs decide to fall back.
The Fenrir Captain seeks out the orc Subchief for battle. They fight in the stream. The Captain attacks but misses. The Subchief rolls a twenty and hits the Captain for 4 hp.
Round 5:
Tied intiative (6,6).
It’s all over except for the fight between the orc Subchief and the Captain. Unfortunately for the Captain, the Subchiefs guards surround him and attempt to grapple him. The battle may be lost, but if they can kill of the Fenrir Captain, at least they will have some fraction of vengeance.
There are five grapplers, the Captain fends off three of them. But two do get a chance to grapple. Both succeed in grappling the Captain. One grabs the Captains hand, the other gets a waist clinch. The Captain take 2 hp from the grapple. The Captain throws off the waist clinch but remains in the hand lock. The orc subchief shanks him for 7 hp damage.
Round 6:
Orcs win intiative (5,3).
The Captain, in a hand lock, can no long fend. The orc guards move in grapple once more. There are three more successful grapples, two more waist clinches, and an arm lock. The Captain take 3 hp grappling damage. Yet the Captain does throw off the two waist clinches while knocking out one of the clinchers with a kick. The Subchief attempts to shank him but misses.
The Captain breaks the finger lock with a head butt. The arm lock remains in place.
Two of the Fenrir Lieutanants move in to cover the Captains flanks. They strike, but do not kill, two of the orc guards (4 & 3 hp damage).
Deadleaf takes three shots at the orc guards moving in on the Captain and his Lieutanants. He gets two hits for 9hp, the guard is still up. Huckleberry does the same, he gets one hit for 6 hp, the guard is still up.
Round 7:
Orcs win intiative (5,2)
The armlock stays in place. Two more orcs waist clinch the Captain. The Captain flips both waist locks off. And, throws off the arm lock. The orc Subchief attacks and misses.
The Captain strikes the Subchief for 7 hp. He’s still up.
At this point, the remaining heavy infantry moves in to engage the Subchiefs guards. They finish them off.
Round 8:
Fenrir win initiative (5,4).
The Captain waves his troops off from attacking the Subchief (he’s mine!) He strikes for 3 hp. The Subchief is now done to a single hit point. He fails morale and surrenders.
It’s over. another win for Fort Fenrir.
Casualties
Fenrir
10 Light horse
5 Light infantry
13 Heavy Infantry
17 Longbow
Orcs
20 Axe & Crossbow
33 Axe
40 Sword & Spear
30 Forks
Captured
27 Axe
20 axe & Crossbow
30 forks
Subchief
4 guards
2 leaders
6 assistants
Plus whatever loot wagons were left standing in the back field.
Discussion:
The orc decision to try to ambush combined with the required separation distance led to them choosing a spread out set of formations that let them be defeated in detail. They’d likely have fared better just choosing to bunchup in the open between the gully and the hill.
But the Fenrir chosen starting positions also let the longbows get savaged hard. The light foot could have had it worse too. They got lucky in their engagement with the Crossbow orcs.
The lesson for the fork orcs is get longer forks if you are going to encounter lance armed cavalry. The lesson for the light horse, given their limited numbers, is don’t try to enchange blows with larger formations, look for an opportunity from a safe distance, then use your speed to grab it.

 Fluid -- Druid
Leave a comment