

This is a dueling method for AD&D. It is not recommended for regular combat. Really, only used voluntarily if both parties choose to do so.
This breaks the 1-minute round into component segments. Remember, under standard AD&D combat rules, the attack roll and any damage done represent the aggregate result of multiple attacks, blocks, feints, etc. during the round. The rules here break it down into what happens during those individual segments. This is too long, to detailed an not advisable to use except under unusual conditions, such as a formal duel. Even then, I’d default to using the standard procedures if one side of the battle prefers them.
One goal here is to create a more dynamic and colorful combat than the mere whittling away of hit points. If a shield is used, most lethal areas of attack are covered. So, the game is to use whatever means available to render the shield useless (damaging it, hooking it, etc.) so that more sensitive areas are revealed. Note that low level characters will likely go down quickly. But, high level characters with lots of hit points should be trickier to take down. Nonetheless, a lucky low-level character still might do some real damage and leave a high-level character with some scars if nothing else.
Time Scale is Segments. A Segment is six seconds long. Ten segments make a round.
Referee sets initial distance apart. If a duel, the characters agree on distance apart.
Before initiative is rolled, characters choose a stance.
Stances
There are three stances, Left Forward, Centered, or Right Forward. Some Aim Points may not be targeted for characters in these stances.
- Left Forward characters may not have points FR, CR, KR, TR, HR, LR, ER, AR, SR, RC targeted.
- Centered characters may have any point targeted.
- Right Forward characters may not have points FL, CL, KL, HL, LL, EL, AL, SL, LC targeted.
During combat stance may be changed but a character must take a full segment to do so. During the changed segment, any Aim Point may be targeted. Note: that the table assumes that characters fight with a weapon in the right hand and, if a shield is used, the shield is used with the left arm. A character in Right Forward stance may not have their shield targeted, nor get the benefit of a shield.
Shields
Shields prevent parts of the body from being targeted. A shield always prevents attacks to HL, LL, EL, AL, SL, LC, A, G. In addition, a shield may be held high or low.
- High shield position prevents attacks to H, N, RC, SR, AR, ER, LR, HR
- Low shield position prevents attacks to TR, TL, KR, KL.
Shields are subject to damage but not wound effects (see below). Small shields take 10 hit points of damage before being destroyed. Large shields take 20 hit points of damage before being destroyed. For each strike to a shield, failure to make a save versus normal blow for the shield material (wood is 10 and metal is 6) results in the shield taking damage.
Initiative.
Initiative is rolled only for Segment 1 and every ten segments thereafter (i.e. Segment 11 requires another initiative roll). Whichever character rolls highest for initiative may attack first, followed by the character that lost initiative. If the character who lost initiative suffers damage or an effect of combat, he takes account of those effects immediately prior to his response.
All other non-initiative segments are considered simultaneous. Both characters carry out their attacks and any effects are suffered the following segment.
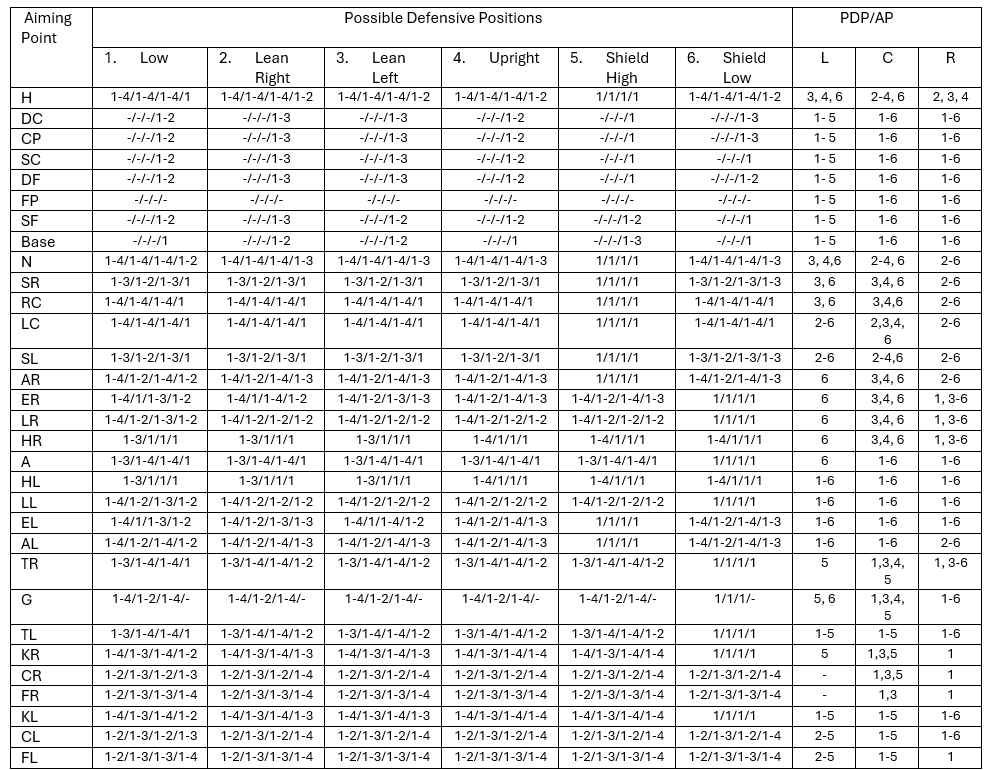
Attack Matrix Summary
Each character is required to pick an Aim Point and a Defensive Posture, and Damage type to be used based on the weapon. Some Aim Points are not possible given an opponent’s Stance, Defensive Posture, and whether they are equipped with a shield. The Attack Matrix shows for each Aim Point and Stance which Defensive Postures are available.
Note that the Attack Matrix only looks at the Attackers Aim Point, Attacker’s Stance, and Defender’s Defensive Posture. The Opponent’s stance may also eliminate some Aim Points possible for that opponent. Each player must inform the opponent of his stance and whether he has a shield, but after that, if an attacker has chosen an Aim Point prohibited from attack based on stance or shield, then that attack is considered a miss. However, if the Defender fails to realize the Aim Point is prohibited and effects have already been applied, then the attack is considered valid.
The basic attack procedure is that each character chooses Defensive Posture openly, then Move, Aim Point, and Damage Type are determined secretly. These are revealed and may not be changed for the segment. The attacker cross-references his attack with the defender’s defensive posture to determine the effect. Standard AD&D to-hit and damage rolls are made to determine damage and whether the damage effect happens. For every three points greater than the needed to-hit number, the Aim Point may be shifted up or down a row. Armor class is treated as normal (use weapon modifiers), but the head AC is 3 for a great Helm and 5 for a small helmet (unless normal AC is less).
Note: because shields are accounted for in the attack matrix, to-hit rolls are against armor class not counting shields.
Note: Parrying. On a per-segment basis, a character may choose to parry. If parrying, they may not attack, but their strength to-hit bonus is subtracted from attacker’s to-hit roll.
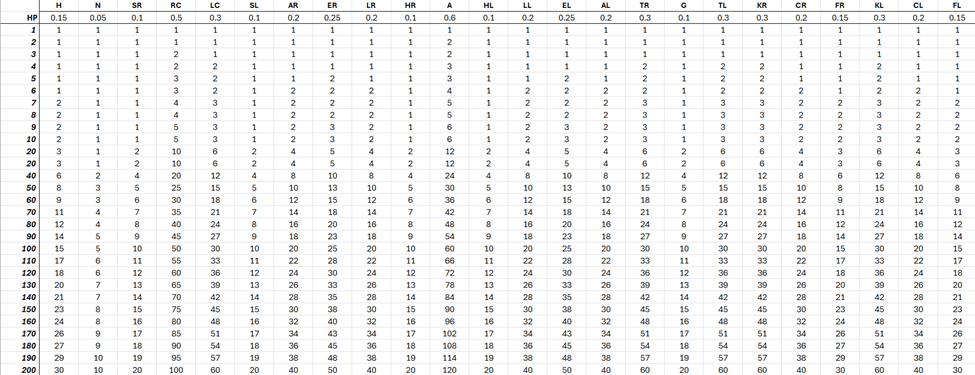
Hit Location Damage
Each aim point can sustain only a proportion of the character’s total hit points before it becomes unusable. The table below allows looking up a character’s total hit points and determining the proportion for each part. Note that taken together, this adds up to more than the character’s total hit points. The exact proportions are shown at the header of the table if people want to get finicky and calculate their own exactly. The quicker method, if there is no exact row for your character’s hp, is to round up to the next highest row and use those values – don’t worry it’s close enough.

The body is divided into three levels of lethality.
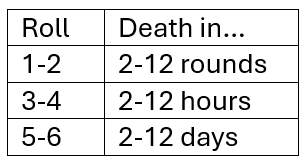
- Red Zones are immediately lethal areas. If one of the Red Aim Points hit points is exceeded, then the character is considered to have been dropped to zero hit points. In addition, if the sum of all the red zone hit points exceeds the characters total hit points, they are also killed – treat this sum as real hit points damage if the total is more than the negative hit points allowed by the characters constitution, then they have been killed. Otherwise follow the DMG rules for first aid.
- Orange Zones are lethal but not immediately lethal areas. If one of the orange zone areas hit points are exceeded, they may keep fighting until the duel is ended. For each orange zone whose hit points are exceeded, the character must make a System Shock roll, failure of a System Shock roll means death according to a roll on the table below.
Orange zone deaths are implacable internal injuries that take a Heal spell to avoid.
- Yellow Zones are not lethal areas. A character cannot be killed through damage to these areas. Exceeding the hit points of a yellow zone area renders that area unusable. In addition, for limbs exceeding the hit points of a yellow zone renders unusable all yellow zone areas down from the injured area. For example, exceeding the elbow (ER or EL) hit points renders the lower arm (LR or LL) and the hand (HR or HL) unusable. For each yellow zone whose hit points are exceeded, after the end of the duel, the character must make a System Shock roll, failure of a System Shock roll means the affected Aim Point is rendered permanently disabled. Unusable hands must drop any held weapon. For arms with shields, small shields are dropped, large shields are not dropped but nonetheless lose all ability to block Aim Points. Note that for two-handed weapons losing the use of one hand renders the weapon unusable.
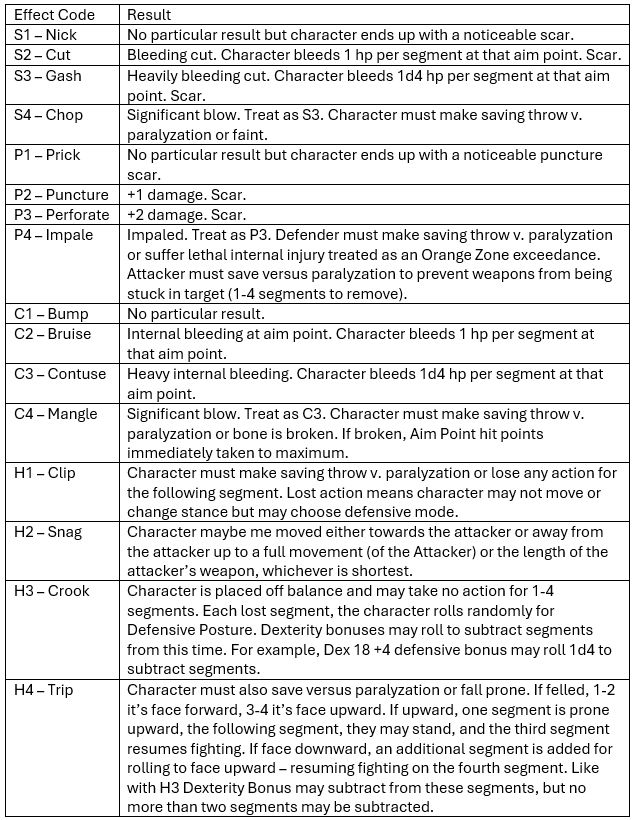
Hit Effects
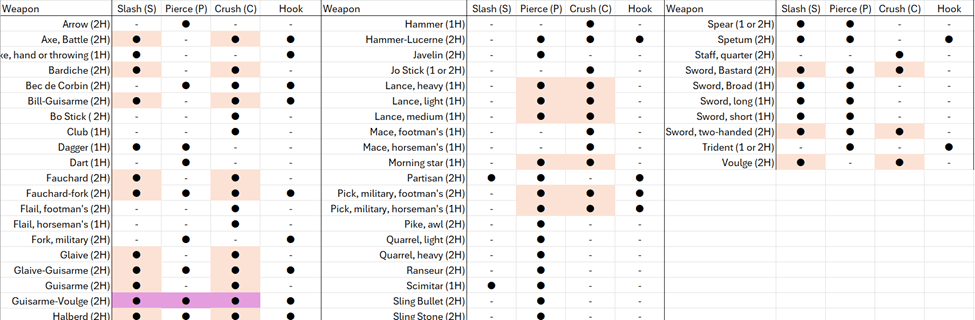
Each Weapon Type has modes of attack. This include Slash, Pierce, Crush, and Hook. The weapon table shows which modes are available to each weapon type. The attacker chooses which mode he is using prior to rolling to hit. Those modes marked in orange are applied together. For example, the Battle Axe slashes and crushes simultaneously whereas the Hand axe only slashes. Both the Battle Axe and Hand axe can choose to forgo the other modes and hook.
If hook is chosen as the attack mode, then no damage is rolled after a successful hit.
For modes marked in purple, the attack must choose any two of the three modes available.
The table also notes how many hands are required to use the weapon.
After a successful hit, the Defender’s Defense Mode is cross references with the Attackers Aim Point to determine the Hit Effect. Each box list effects for all four attack modes is the order of Slash, Pierce, Crush, and Hook. For example, 1-4/1-2/1-2/1-4 means to roll for the Slashes 1-4 for effect, Pierces and Crushes roll 1-2, Hooks 1-4. The table below describes these effects.
Movement and Weapon Length
There are three options for movement:
- Stand still. No movement
- Move toward an opponent up to the characters allow maximum movement (specified in the segment orders)
- Move away from an opponent up to the characters allow maximum movement (specified in the segment orders)
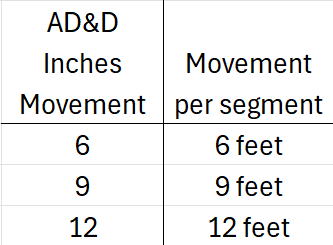
Note that this allows for side-to-side movement, but the assumption is that characters will automatically turn to face their opponent. In effect this means there is only forward and backward movement.
Like combat, except for the first segment, all movement is simultaneous. If the two characters end up in contact with one another, then the end point is at where the heavier character would have ended up.
- A character may not attack if the distance to their opponent is greater than their weapon length.
- For polearms, if the distance is less than half their weapon length, then only crush effects may be applied.
- For all weapons (including polearms) if the distance is less than half their weapon length then damage is halved (fractions dropped).
- If characters are in contact with on another, then only daggers may attack or one character may choose to enter unarmed combat. If unarmed combat is chosen, then immediately exit these rules and proceed to the unarmed combat rules.
Note that charges, per the AD&D movement and effects rule can occur only on the first segment and, as normal, charges trump initiative. Charging restricts stance to Centered and Defensive Postures to 4-6. Certain polearms (per the AD&D rules) may be grounded versus charges) – grounded weapons may only attack charging opponents.
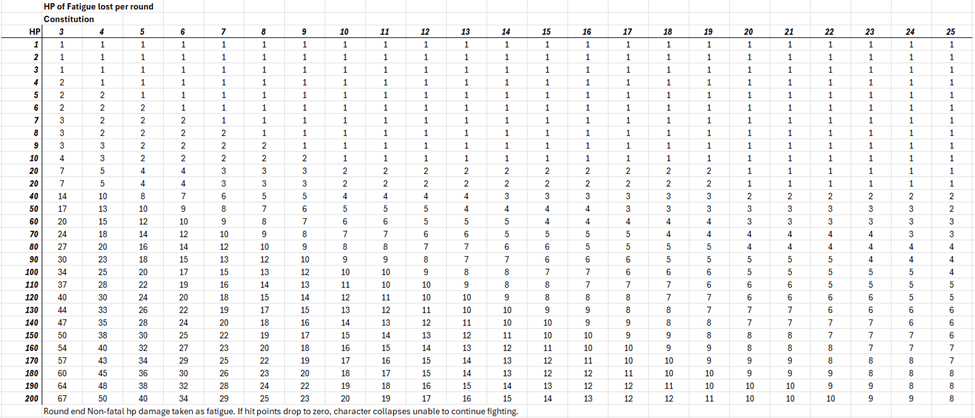
Fatigue
At the end of the tenth segment of combat, fatigue is assessed. Any standing character takes hit points of (non-fatal) damage of fatigue based on their hit point total and constitution score. Use the row of the table rounded to the row of your nearest hit point value. If a character’s hit points drop to zero or lower from fatigue, the character collapses unable to continue.
Detailed Combat Sequence
- Referee or Players set starting distance.
- Characters declare Stance, Defensive Posture.
- Roll initiative.
- Character write orders that include
- Movement (including whether charging)
- Aim Point (as restricted by defensive posture)
- Damage type for the weapon (S/P/C/H or various allowed combinations)
- Whether the weapon is grounded or other special attack is being used per the AD&D rules (e.g. disarming attack for a spetum).
- Or magic casting (not advised, but maybe some short casting time spells might work if starting distance is long).
- Both sides reveal orders.
- For the first segment charges are resolved.
- If both sides charged it’s simultaneous. Both sides resolve movement, attacks, and damage effects.
- If only one side charged, then that sides attacks and damage effects are resolved first, followed by the defender’s attacks and damage effects.
- For the first segment, if there are no charges,
- The character who won initiative resolves his attacks. Any damage effects are applied.
- The character who lost initiative resolves his attacks. Damage effects are applied.
- For the second through the tenth segment.
- Both sides declare any stance changes and defensive posture.
- Both sides write orders.
- Movement (including whether charging)
- Aim Point (as restricted by defensive posture)
- Damage type for the weapon (S/P/C/H or various allowed combinations)
- Whether the weapon is grounded or other special attack is being used per the AD&D rules (e.g. disarming attack for a spetum).
- Both sides (simultaneously):
- Carry out movement,
- resolve attacks and apply damage effects.
- Any damage effects are applied to the following segment.
- Repeat 8 until the tenth segment is complete. Exception, characters with more that one attack in a round may insert them according to the following schedule. If two attacks are allowed in a round, then the second attack is inserted after the tenth segment. If three attacks are allowed, then attacks are inserted after the 5th and 10th segments. These “extra attacks” do not take more actual time, and unless the opponent also gets multiple attacks, the opponent must use the same stance and defensive posture the had for the most recent segment.
- Once all attacks for the round are made, apply fatigue to both sides.
- Start a new round with a new initiative roll. Note that, per AD&D standard rules, charges may only be conducted once every ten rounds.
- The duel ends when one or more of the characters are dead, disable such that they cannot fight, or concede the bout. An opposing character may choose not to honor a concession. Winning characters may choose to finish off disabled characters.
Option: I proposed an alternative to the standard AD&D to-hit/damage sequence here. One might apply to this method.
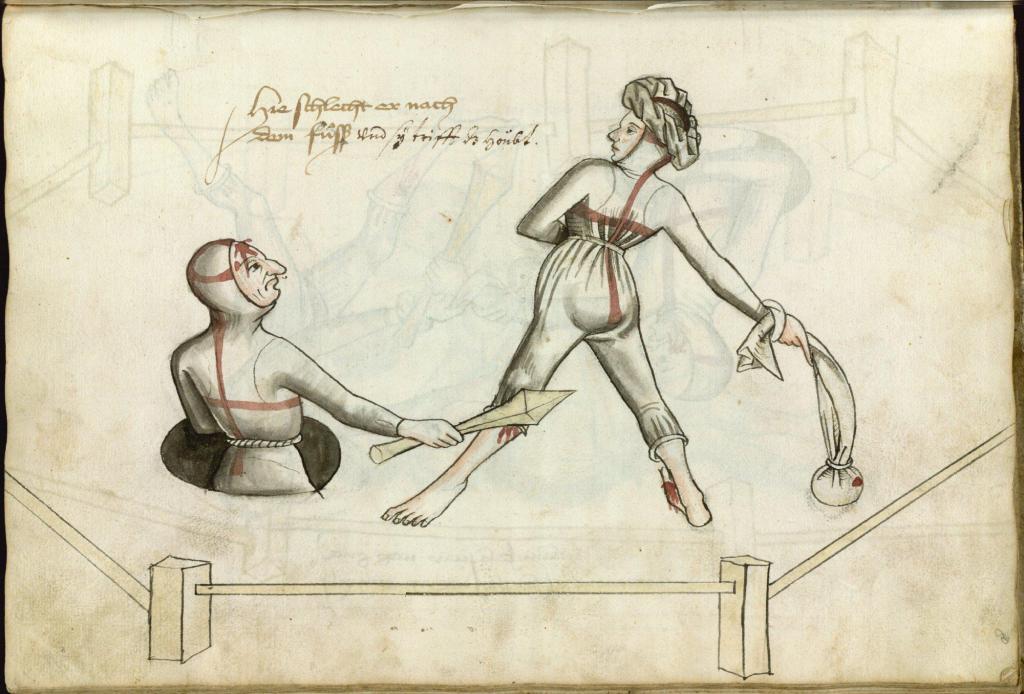
Another option: judicial duels between a man and a woman. The man is placed in a hole and is armed with a club. The woman is on foot and armed with a rock wrapped in sheet. Treat the woman’s weapon as a horseman’s flail. The woman may choose only waist up target aim points. The man may only choose waist down target aim points. Neither side has a shield, but if you’d like a more extended duel, shields might be added to one or both sides.
An example:
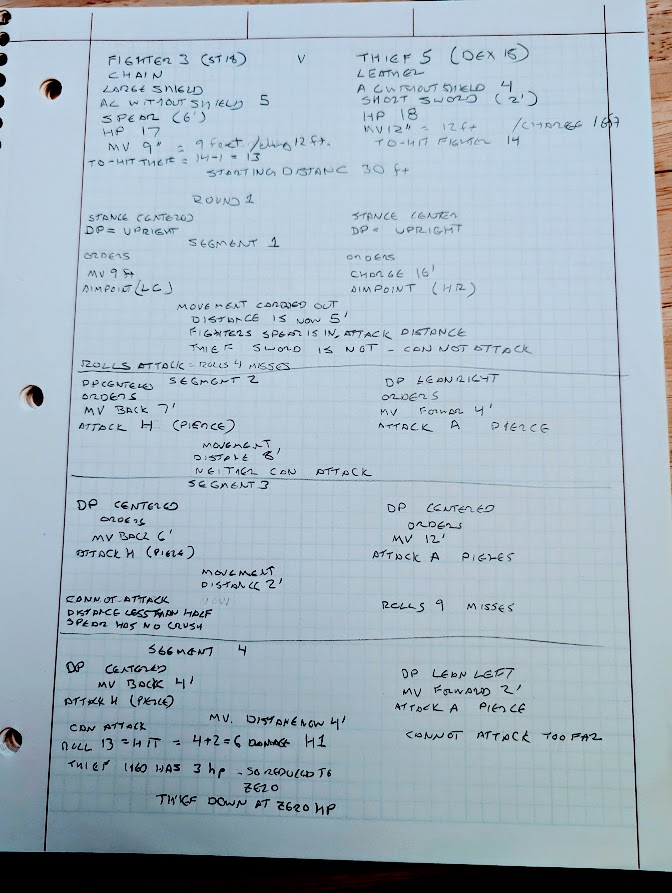
3rd level fighter in chain and shield with spear versus 5th level thief with short sword. This one hinged on managing distance. The thief needed to get close to use his sword and minimize the fighter’s ability to use his spear. The fight took 4 segments. There was no segment where both could attack. The first segment the fighter missed. The second segment neither could attack (both out of range). The third segment the thief could attack but missed. The fighter could not attack because his spear was at less than half its length and has no crush aspect. The fourth segment the distance was too long for the thief but the fighter could attack. Fighter succeeded with a head shot (effect rolled as P1) which dropped his opponent. But the thief, felled only by a single head shot is considered at 0 hp and could be revived with first aid though he’ll sport a distinguished scar.

Leave a comment